Briefly introducing keywords and choices made:
Node

“Node.js is a JavaScript runtime built on Chrome’s V8 JavaScript engine.”
Or how I like to think, is a platform allowing one to code in JavaScript without needing the browser, which has led to the birth of NPM and how we now know node and npm. Follow a timeline of the events here.
Express
“ Express is a minimal and flexible Node.js web application framework that provides a robust set of features for web and mobile applications.”
Since I have a Rails background, it reminds me more of Sinatra since it is quite minimal and flexible as stated. With that said, it is much easier getting started with Rails. It’s probably the equivalent of Django vs Flask when it comes to Python.
API

As briefly introduced in a previous blog post, an API, simply put, is a way for applications to communicate with one another.
And in this post we’ll build an API to:
- store basic data
- handle communications between a client and a database
- manage external fetch requests to other APIs
MongoDB

is a major player when it comes to NoSQL databases. It has its advantages and challenges so reviewing them for which is best for your use case is best before deciding.
Cookies

You’ve probably aware of cookies already — they’re a way of storing information in a browser pertaining to a web application or your browsing activity. We’ll be creating a user session, or continually keep a user logged in, by creating a cookie.
It can be done via localStorage as well, and some argue which is better but for our uses, both are more than sufficient especially if you’re hashing or securely encrypting the data beforehand.
JWT
stands for JSON Web Tokens, allows you to decode, verify and generate secure tokens, or pieces of information. We’ll use this so we can store a user session in a cookie!
.ENV
Environment variables are mentioned all over the place when you browse online tutorials and blogs; especially when you are dealing with API keys or other sensitive and/or personal information you don’t want to share with GitHub or anyone else, or at least allow you to pick and choose whom to share with.
As the name implies, they are specific pieces of data pertaining to your application and what it needs to run successfully.
I found it very difficult understanding how to deal with them in Rails, but it was very simple with Express!
Routes
also known as paths, URL, or URIs — there’s probably a technical difference to all of them! We’ll be declaring RESTful paths for our API and application. It allows an industry standard for users and developers to understand and navigate web applications.
Example:
https://medium.com
https://medium.com/@lpault29
https://medium.com/@lpault29/following
Fetch API
is a simple and more intuitive way of “fetching” information from other APIs.
It originally took me a hot minute trying to figure out how to do this with Express, and then it hit me — why not just use the Fetch API?! It has 0 dependencies compared to the request package I was using which had 20.
It’s also much more intuitive and easier to understand when reading through the code!
fetch(url, options)
  .then(response => response.json())  // convert into usable format
  .then(data => {
    // do something to data
  })
Database

We’ll be using mLab, which was recently bought out by MongoDB, to spring up a free cloud-based MongoDB NoSQL database. mLab is great as an introduction to MongoDB since there’s so much to learn moving from a SQL understanding, and it offers an interactive UI instead of a command line interface.
Basic Auth

I just realized Auth could mean either authorization or authentication — here we are referring to authentication!
A basic example would be to:
- Take in the user’s input for username and password
- Compare that to what’s stored in the database
- If it matches then allow the user to use your application, and otherwise to try again or to register on your platform
Hashed Auth with Bcrypt

In order to authenticate anything, you must store that information to access later on right? Your database would then contain much sensitive and personal information on your users and information used with or for your application. It could become a target for nefarious hackers!
To prevent easy access and to thwart such evil-doers, we will encrypt passwords prior to saving it in the database. And then when a user comes to login, we first retrieve the secure password in the database, decrypt it and then compare.
Bcrypt is a minimal package allowing such abilities and is available across other web frameworks too.
CRUD
Create, Read, Update and Delete — the four functions a model should be capable of.
When it comes to logins:
- Create a user account
- Read or access user account information
- Update account information
- Delete a user account
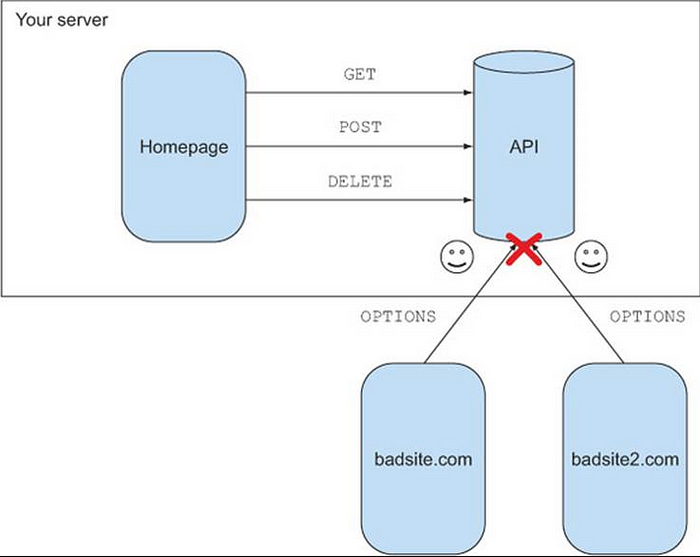
CORS
Cross-Origin Resource Sharing is a way of restricting and allowing access from certain origins or hosts.
If you’re familiar with MAC address filtering with routers, you can think of it in that manner — just realized it isn’t that secure, so it doesn’t even seem worth it.
// this allows only HTTP requests from medium and googleconst whitelist = ['https://medium.com', 'https://www.google.com']const corsOptions = {

  origin: function(origin, callback) {    if(whitelist.indexOf(origin) !== -1) {      callback(null, true)    } else {      callback(new Error('Not allowed by CORS'))
    }
  }
}
You cannot only restrict origins, but you can also restrict HTTP methods too — GET, POST, PATCH, DELETE, UPDATE.
// only allowing GET HTTP requestsconst corsOptions = {
  origin: '*',
  methods: 'GET'
}
Morgan
A piece of middleware that will print out HTTP request hitting your API and information pertaining to it to the console for your convenience!

See here we have three GET requests at routes: /, /app/login, and /app/auth.
Cookie Parser
This helps parse cookies into a easy format to deal with. Then we can easily access, set cookies with res.cookie() and delete cookies with res.clearCookie().
BodyParser

A piece of middleware allowing us to parse for various data formats including urlencoded and JSON. In other words it can take data in and convert it to a format you can work with. Perhaps think of converting a PDF into a Word document so you can edit it, and then converting it back to a PDF to send it.
Refer to this for more info, but if information coming in is JSON but you’re not parsing JSON data then it will become difficult to read and manipulate that data.
What you’ll need to get started
- Node.js
- mLab account
- Code editor — VSCode, Atom, Sublime Text, Notepad++ — if you use Atom, check out some tips here.
- Terminal — I’m using GitBash on a Windows PC
- GitHub (optional)
Getting Started
Step 1
Create a directory or folder where you’ll store and save all your files for this project. You can do so in the finder/explorer, or via the terminal. I keep a folder called code for everything development.
cd /code
mkdir example-api
Step 2
Create some files to start with and initiate a new node project.
cd example-api
touch server.js
touch routes.jsnpm init
// you can press enter or return for each prompt
Step 3
Install some dependencies or packages and then open it in your code editor.
npm install bcrypt               // encrypt and decrypt passwords
npm install cookie-parser        // manage browser cookies
npm install dotenv               // manage environment variables
npm install express              // web framework
npm install jsonwebtoken         // encrypt or hash information
npm install mongodb              // database
npm install morgan               // shows http requests on server
npm install node-fetch          // the fetch API
npm install nodemon             // restarts server with file changescode .                         // opens the current folder in VSCode
                               // atom . is the atom equivalent
Step 4
You’ll now have a package.json file which lists out your project’s information. Let’s change the start script under scripts.
"scripts": {
  "test": "echo \"Error: no test specified\" && exit 1",
  "start": "nodemon server.js localhost 3000"
},
Now when you start the server, nodemon will look for changes and if there are it will automatically restart to reflect those changes; in other words, on every save the server will refresh.
You’ll notice all the installations you did in the terminal are listed under dependencies in your package.json file.
"dependencies": {
  "bcrypt": "^3.0.2",
  "cookie-parser": "^1.4.3",
  "cors": "^2.8.4",
  "dotenv": "^6.1.0",
  "express": "^4.16.4",
  "jsonwebtoken": "^8.3.0",
  "mongodb": "^3.1.8",
  "morgan": "^1.9.1",
  "node-fetch": "^2.2.0",
  "nodemon": "^1.18.5"
}
Step 5
Let’s start with some setup code then! Open up server.js!
const express = require('express');
const app = express();
const PORT = 3000;app.listen(PORT, () => {
  console.log(`app is up and running captain!`);
});
Now if you run npm start, in the top level of your folder, you can start the server in the terminal and you’ll see your logged statement.
Playing Around with Express
res.send()
app.get('/', (req, res) => {
  res.send("hello world")
})
res.json()
app.get('/', (req, res) => {
  res.json({ first: "john", last: "doe" })
})
res.redirect()
app.get('/', (req, res) => {
  res.redirect('/hello-world')
})app.get('/hello-world', (req, res) => {
  res.send('hello world')
})
And now even if you go to http://localhost:3000, you’ll be transferred to http://localhost:3000/hello-world.

You can follow Express’ documentation and guides for more basic setup, but I won’t waste anymore of your time with it!
Next time we’ll cover:
- setting up the database
- creating RESTful routes with full CRUD functionality
- encrypting passwords and tokens for user sessions